Decision Parameter in Metrological Confirmation
The Maximum Permissible Error (MPE) or Acceptance Limit is a decision parameter in the metrological confirmation process.
Instrumentation is used in the production process, contributing to product quality achievement.
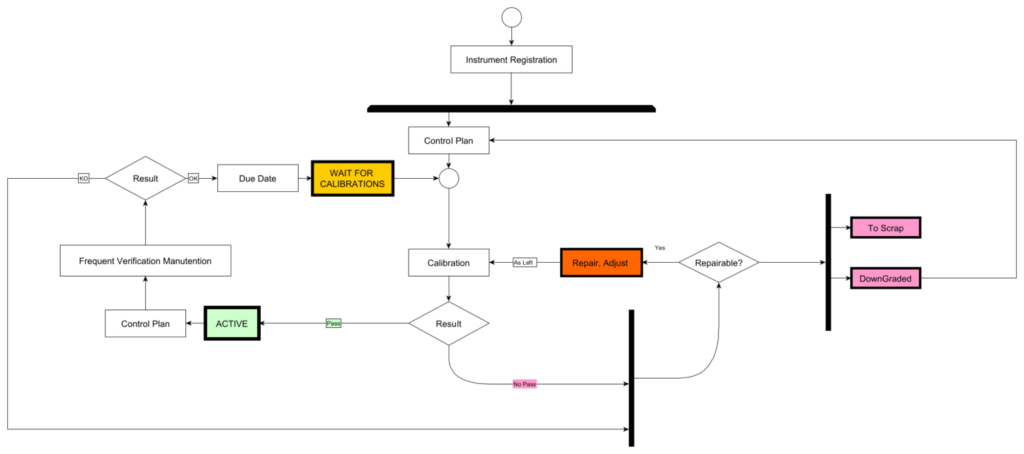
To ensure adequacy to the required standards, a periodic monitoring process is activated.
This process is the metrological confirmation and starts with the definition of acceptance parameters, calibration procedures, recalibration intervals, and planning of inspections and maintenance.
The acceptance limit is freely determined by the company, directly based on the measurement capability within the production process.
The choice of the acceptance limit is the criterion by which the status of the instrument is determined, from active to scrapped or downgraded.
Defining the parameters involved in the Metrological Confirmation process requires attention.
This is a delicate choice because it influences Quality but also Costs resulting from repurchasing in case of scrapping and the number of verifications.
Detailed Explanation of Maximum Permissible Error (MPE) in Various Standards
ISO/IEC 17025: General Requirements for the Competence of Testing and Calibration Laboratories
ISO/IEC 17025 is a fundamental standard for testing and calibration laboratories, emphasizing competence, impartiality, and consistent operation. It defines MPE as the “Maximum Permissible Error” that a measuring instrument is allowed to have while still being considered fit for its intended use. The standard outlines the procedures and criteria that laboratories must follow to ensure that their instruments meet the specified MPE. This includes regular calibrations and the establishment of acceptance criteria based on the measurement uncertainty and the intended application of the instrument.[Wikipedia]
IEC 61557: Electrical Safety in Low Voltage Distribution Systems up to 1000 V AC and 1500 V DC
IEC 61557 focuses on equipment used for testing, measuring, or monitoring protective measures in low voltage distribution systems. It sets MPE as the maximum deviation allowed from the true value under specified conditions. For example, this standard provides detailed tables and formulas to determine the acceptable error margins for various testing instruments, ensuring their reliability and safety in electrical installations.
OIML R 76: Non-Automatic Weighing Instruments
The International Organization of Legal Metrology (OIML) R 76 standard addresses non-automatic weighing instruments. It specifies MPE in relation to different classes of weighing instruments. For instance, the MPE for a Class I instrument (high precision) is much stricter compared to a Class III instrument (standard industrial use). The standard includes detailed tables listing the permissible errors at various load levels and provides formulas to calculate MPE based on the scale interval and the instrument class [❞].
Practical Application and Examples
- ISO/IEC 17025: Laboratories must regularly calibrate their instruments against standards with known uncertainties. If an instrument’s error exceeds the MPE, it must be recalibrated, repaired, or replaced. For example, if a laboratory uses a balance with an MPE of 0.1 mg, and it measures 0.2 mg deviation, it fails the MPE criterion and requires immediate attention.
- IEC 61557: A clamp meter used for measuring electrical current in an industrial setting must adhere to MPE guidelines. If the meter’s readings deviate beyond the permissible range outlined in IEC 61557, it could lead to incorrect diagnoses of electrical faults, compromising safety.
- OIML R 76: Retail scales used in grocery stores must meet strict MPE standards to ensure customers receive the correct weight of products. For a Class III scale with a division of 10 grams, the MPE at maximum capacity might be ±30 grams. Exceeding this error means the scale is not compliant and must be adjusted or replaced.
Formulas and Tables
Each standard includes specific tables and formulas to calculate MPE. For example:
- ISO/IEC 17025 provides general guidelines but refers to specific equipment standards for detailed MPE criteria.
- IEC 61557 includes tables correlating test conditions and MPE values, ensuring consistency across measurements.
- OIML R 76 features extensive tables indicating permissible errors at various loads for different instrument classes.
These standards ensure that MPE is well-defined, measurable, and applicable to various testing and calibration scenarios, promoting accuracy, reliability, and safety in measurements.
For further details, you can refer to the specific standards:
Control Plan and MPE
In ByteQX-GS, the MPE is defined within a control plan.

This allows:
- Using it as the maximum error declared by the manufacturer.
- Defining it from the metrological characteristic required by the process/product to be measured.
- Using it according to specific standards proposed.
- Varying it for each individual control.
- Adjusting it based on the zeroing mode.
- Associating it with a category of instruments.
Internal and External Calibrations
The Calibration Certificate itself does not express a result, as the objective of calibration is measurement, thus expressing the measurement and comparison results.
It is therefore an internal decision to confirm whether the measured errors determine a confirmation of status or the need to scrap, downgrade, or repair.

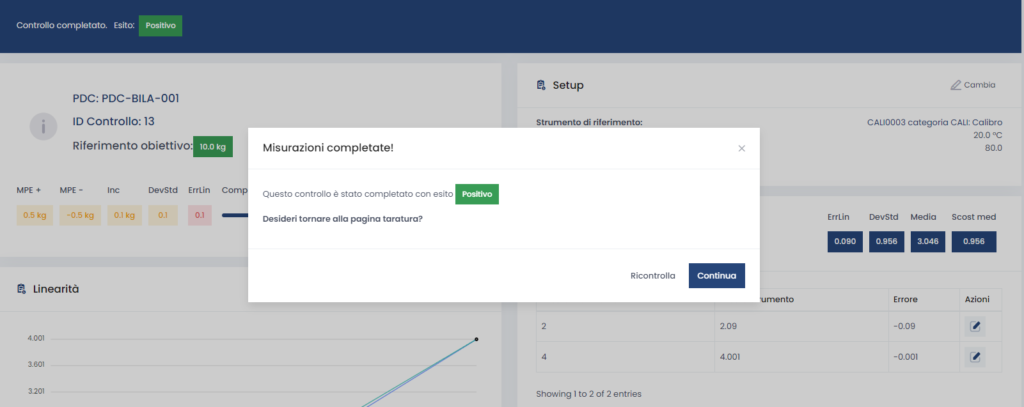
In the case of internal calibration, it is possible to associate acceptance criteria with control plans, obtaining a calibration report with the measurements and the outcome concerning conformity criteria.
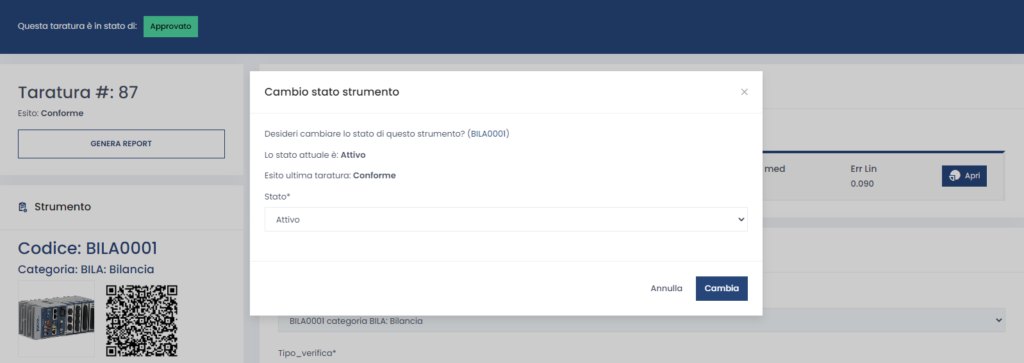
At the end of the measurements, a request is made to modify the status based on conformity or otherwise.
In the case of external calibration, it is possible to compare the criteria with the measurements obtained from the certificate, thereby determining the outcome and status modification.

Calibration Management Software
The confirmation process is iterative.
The spreadsheet used cannot provide registration with references and interactivity that a database-based software can offer.
Software like ByteQX-GS includes a control workflow that starts with the entry of the instrument, the planning and recording of calibrations based on control plans and acceptance criteria.
It involves a confirmation process at each control and the possibility of confirmation due to an event outside the control period, such as accidental breakage.
All of this is tracked and quickly reported in the Instrument sheet.


